
So if we’re following the diagram path from my previous post, the first step in the chain is the hand-off of the WAN connection from my ATT gateway to my Fortigate firewall. That being said, I’ll focus a few posts on that hand-off and some other helpful things I use to manage my Fortigate.
Disclaimer: I’m not a hyper-experienced graybeard when it comes to FortiOS, Fortigate devices, or Ansible. I just managed to get this working for my use-case and want the information to be out there if anyone else runs into the same problems I did
Initial Setup
What I aim to do in this post is explain how to piece together your Fortigate device, Ansible, and your certificates. Having said that, I will avoid going into detail about how to install/acquire those individual pieces, just how to get them to talk to each other.
Fortigate
- Device: FortiWifi 60E
- OS Version: v7.0.3
- Unlicensed/No Support Agreement
You’ll want to start by navigating to your Fortigate’s admin web interface and enabling certificates from System > Feature Visibility
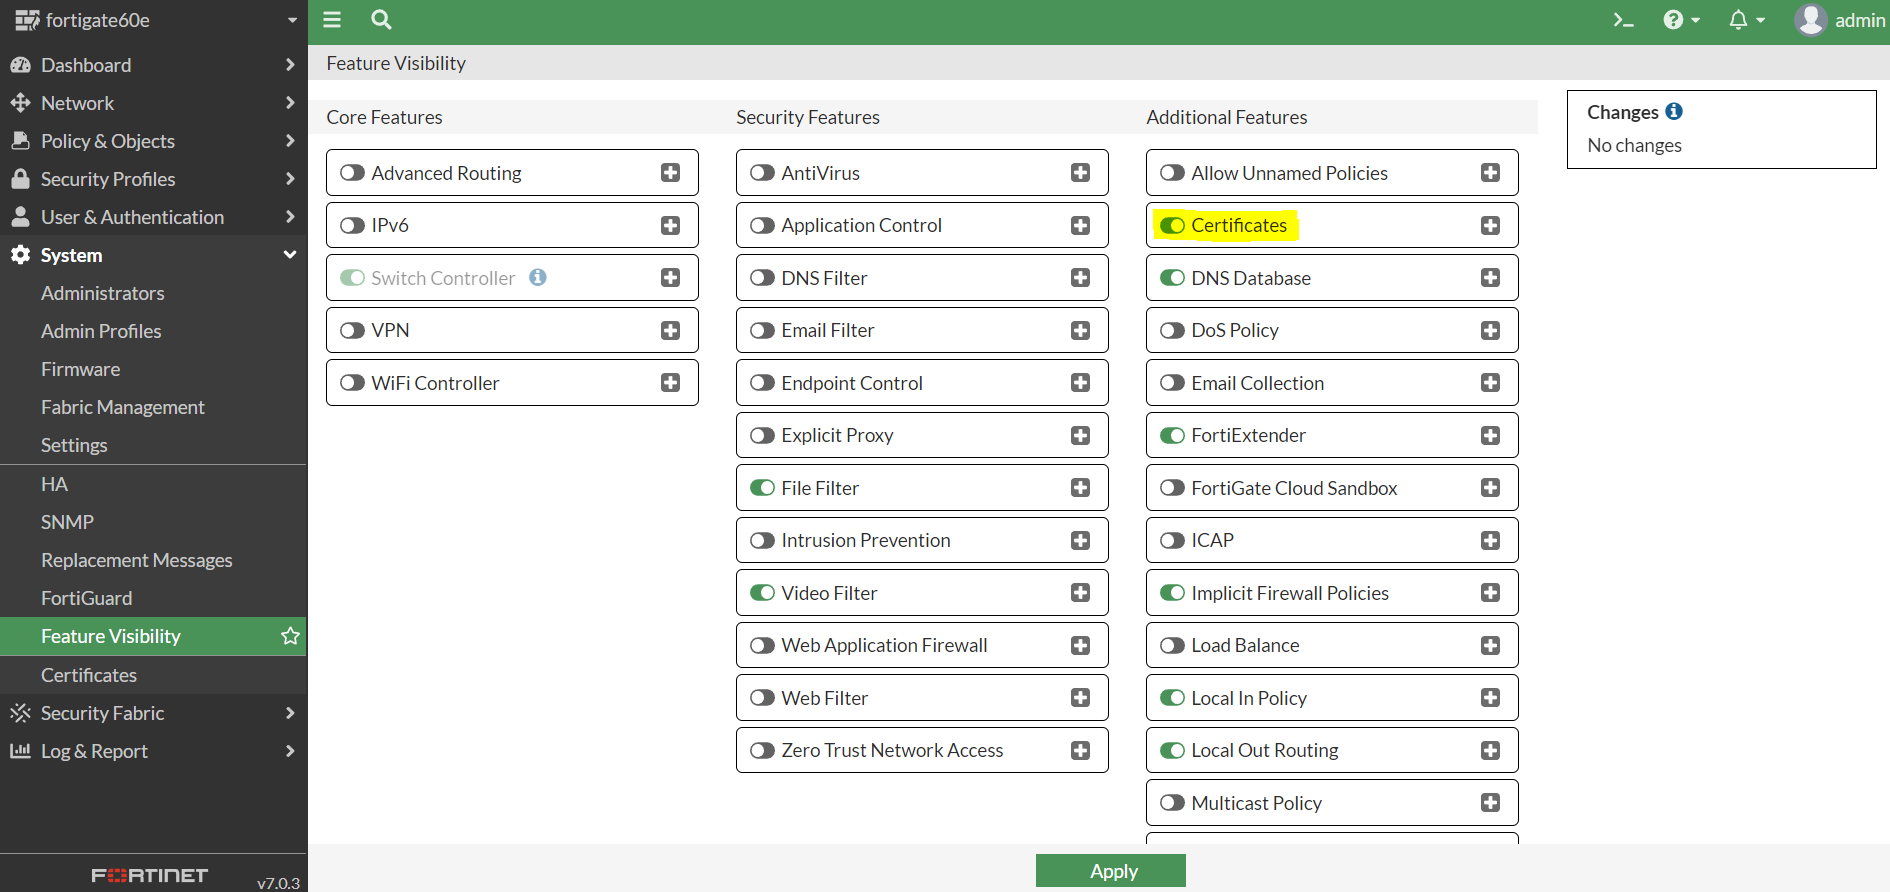
That’s pretty much it as far as the Fortigate setup goes.
Ansible
As I said, I’m not going into much detail on how to install Ansible or configure a playbook. I will, however, attempt to provide links to the necessary resources.
I configured my host inventory and playbook structure similar to the ones in the official FortiOS Ansible playbook documentation, and used the “fortios_access_token” method in my inventory file. You will probably want to use the above documentation to test and troubleshoot connectivity to your Fortigate before jumping into these playbook files, it can take some time to get the hang of things and establish connectivity if you haven’t used Ansible or these modules before.
Certificates
In my own setup, I am currently using my existing Secure Web Application Gateway (SWAG) instance that has Certbot bundled in. It’s a great Nginx reverse-proxy, certificate manager, etc. all-in-one solution. Currently my process is to just use Ansible to rsync the generated certs from the Docker mounted SWAG volume to a local folder in my Ansible host, and send them up to the Fortigate or other services/devices from there. You can also use Ansible to generate your certs, or Certbot standalone, or just pull them in from wherever if you have them stored locally anywhere ansible can reach.
Putting it all together
If you just want the code, I have it available on my Github. I’ll try to break down the individual files as best as I can below.
Inventory
[fortigates]
fortigate60e ansible_host=192.168.1.1 fortios_access_token=xxxxxxxxxxxxxxxxx

[fortigates:vars]
ansible_network_os=fortinet.fortios.fortios
This is what my inventory file looks like. I’m not sure if creating a group is needed, but it’s what worked for me. Ideally, you’ll want to refer to the Fortinet documentation for creating the access token. That being said, that’s not what I used because it was difficult to find good instructions, so I used this guide.
Variables
We’ll start with vars.yml
---
vdom: "root" #default Fortigate VDOM
private_key: "{{ lookup( 'file', 'path/to/key.pem') | b64encode}}" #the needed encode for the certs to be properly read
cert_content: "{{ lookup( 'file', 'path/to/cert.pem') | b64encode}}" #the needed encode for the certs to be properly read
temp_cert_name: 'temp_cert_name' #name of cert to temporarily change admin server to until new one is uploaded
new_cert_name: 'new_cert_name' #name of newly uploaded cert
dest_certs_path: 'path/to/local/cert/folder' #Used for the rsync pull
src_certs_path: user@hostname:'path/to/remote/cert/folder' #Used for the rsync pull
ssh_key: ~/.ssh/id_rsa #Used for the rsync pull
Most of the commenting here is pretty self explanatory, replace all of the 'path/to' strings with the relevant file paths in your local folders to the specified resources. If you’re using Swag, the keys will be privkey.pem and fullchain.pem in your Swag volume’s Letsencrypt folder. As I understand it, Fortigate will need the full certificate chain for the uploaded cert to be valid.
ssh_key needs to be pointed to the private key used to access the server where your certs are located. I have it set this way because my Ansible host and my Swag host are two separate virtual machines. If your certs will be available locally, you don’t really need to transfer them so you can modify or comment out the necessary lines that say #Used for the rsync pull.
Fetching our certs
Next, is fetch_certs.yml.
---
- hosts: localhost
  gather_facts: no
  vars_files:
    - vars.yml
  tasks:
  - name: create directory to store certs
    file:
      path: "{{ dest_certs_path }}"
      state: directory

  - name: Synchronization using rsync protocol (pull)
    ansible.posix.synchronize:
      use_ssh_args: yes
      private_key: "{{ ssh_key }}"
      mode: pull
      src: "{{ src_certs_path }}"
      dest: "{{ dest_certs_path }}"
This is the play we’re using to fetch our certs from our remote location. Again, if your certs are local, you’ll probably want to change from rsync to the Ansible copy module or just omit the fetch portion altogether and call the certs directly from their location. You could also take this play and modify it to just be separately run on a cron job to pull new certs from your cert location as they are generated, which is likely what I’ll eventually end up doing myself.
We’re running this against localhost since that’s technically where we’re initiating the commands. Then we’re calling our vars file that we created earlier. The first task ensures there is a directory at our destination variable, the next one uses rsync with our private key to fetch the certs from our remote location. You may need to look into starting the ssh-agent (or ideally automating it) so that your private key passphrase (you did set one, right?) can be automatically passed along without further intervention.
Deploy the certs to the Fortigate device
Finally, we’ve arrived at deploy.yml
---
- hosts: fortigates
  collections:
  - fortinet.fortios
  connection: httpapi
  vars_files:
    - vars.yml
  vars:
    ansible_httpapi_use_ssl: yes
    ansible_httpapi_validate_certs: no
    ansible_httpapi_port: 443

  tasks:

    - name: Change Admin Server Certificate #Need to change the admin cert as you cannot delete a cert while it's in use
      fortios_system_global:
        vdom:  "{{ vdom }}"
        access_token: "{{ fortios_access_token }}"
        system_global:
          admin_server_cert: "{{ temp_cert_name }}"

    - name: Delete Local Certificate
      fortios_vpn_certificate_local:
        vdom: "{{ vdom }}"
        access_token: "{{ fortios_access_token }}"
        state: 'absent'
        vpn_certificate_local:
            name: "{{ new_cert_name }}"

    - name: Import Local Certificate
      fortios_monitor:
        vdom: "{{ vdom }}"
        access_token: "{{ fortios_access_token }}"
        enable_log: true
        selector: 'import.vpn-certificate.local'
        params:
            type: 'regular'
            scope: 'global'
            certname: "{{ new_cert_name }}"
            file_content: "{{ cert_content }}"
            key_file_content: "{{ private_key }}"

    - name: Change Admin Server Certificate
      fortios_system_global:
        vdom:  "{{ vdom }}"
        access_token: "{{ fortios_access_token }}"
        system_global:
          admin_server_cert: "{{ new_cert_name }}"
Let’s try to break this down, for your sake and mine.
- hosts: fortigates: we’re running our play against the fortigates group this time, which only has the one host we defined earlier and the vars we used alongside it in the inventory file. Everything between this line and our first task is just copied/pasted/modified from the Ansible playbook documentation for this module.
- name: Change Admin Server Certificate: As the comment explains, we need to change the admin cert as you cannot delete a cert while it’s in use. We’re using the fortios_system_global module and the necessary variables we defined earlier. The {{ temp_cert_name }} just needs to be an existing cert on the server, I personally just use the Factory cert on the Fortigate itself. I’m not sure if the {{ fortios_access_token }} needs to be in each step, I left it in while testing and did not end up removing it.
- name: Delete Local Certificate & - name: Import Local Certificate: here’s where I got stuck for a while. We’re using the fortios_vpn_certificate_local module to delete the cert, then using a different module fortios_monitor to import it. There is some additional info in this Github issue that explains why/how the module used is different from that of the Ansible Galaxy documentation. We’re using new_cert_name for both of these tasks because in my case, the cert I’m replacing will have the same name before and after. You can modify the vars.yml and the respective tasks if you want to modify this. As you can see, we’re not actually uploading the cert files themselves, but creating a cert and then inputting the content of the cert files.
- name: Change Admin Server Certificate: Lastly, we use this command again to set our cert back to the new cert name we just created/uploaded.
Run the playbook
---
- import_playbook: fetch_certs.yml
- import_playbook: deploy.yml
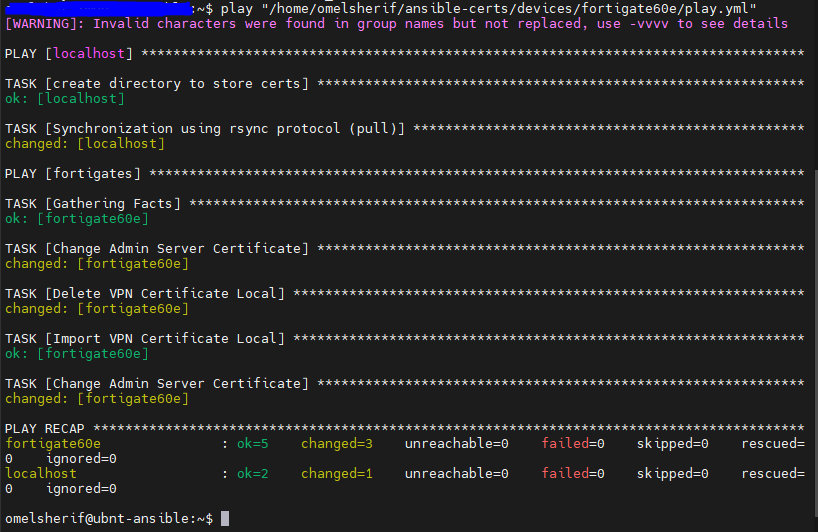
All we’re doing here is a simple play that imports both of the individual playbooks we created and runs them one after the other. If all goes well, and you don’t get any script terminating errors, you should see some output stating there was a successful connection and that your tasks ran without any failures. Successful output should look something like this:
If you check System > Feature Visibility again you should see your newly uploaded cert.

Wrap Up
Well, that about does it. If you have any concerns or want to contribute, or just want to tell me I did something wrong, feel free to open an issue on my GitHub repo linked above. Is that how it works? Who knows, correct me there.